Android fleece hat
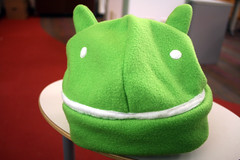
 Last week was miserably cold in Chicago, so over the weekend I set about making a winter hat. I had some bright green fleece lying around, so it turned into an Android head. From start to finish, it didn't take more than an hour and a half.
What you need
- Bright green fleece (amount depends on your head size, should be less than a yard)
- A very small amount of white fleece (one strip about 12" wide and 1/2" high, and two small circles for eyes)
- Optional: enough contrasting fabric to cut two 6" x 5" pieces for the outside of the ear flaps
- Bright green thread
- White thread
Measurements
- Measure the circumference of your head, and add 3 inches; this will be the length of the hat band.
 Divide the hat band measurement by 4, then add 1; this will be the width of each triangle.
- Example: My head measures 23", so my hat band needs to be 26" long. 26" / 4 = 6.5" + 1 = 7.5", so each triangle will be 7.5" wide.
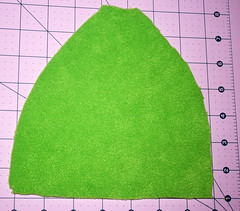
Cutting the pieces
- Cut a strip of green fleece 6" tall, and as long as your hat band measurement.
- Cut 4 green fleece triangles that are 7" tall, with the width you've calculated above
- Cut 4 U-shaped pieces of green fleece, 1" wide and 3" tall, for the antennae.
- Cut 4 U-shaped pieces of green fleece, 5" wide and 6" tall, for the ear flaps (optional)
- Cut 2 strips of green fleece, 1.5" wide and 10" long, for the chin ties (optional)
- Cut 2 U-shaped pieces of contrasting fabric, 5" wide and 6" tall, for the outside of the ear flaps (even more optional)
- Cut two small (1/2" diameter) circles of white fleece
- Cut one 1/2" strip of white fleece, about 12" long (or shorter, if you want a smaller mouth)
 Note: I cut the triangles with rounded edges (see above), which gave the hat little points on each side. To avoid giving the Android a nose, I had to fix it after sewing the front pieces together by sewing a straight line, instead of along the edge (see right). If I did it again, I'd cut it with straight edges.
Sewing the pieces
- Take two antenna pieces and pin them, right-side together. Stitch all the way around the U, keeping the bottom open. Repeat for the other antenna.
 Turn the antennae inside out.
- Take two triangles (#1 and #2) and pin one edge, right-side together. Stitch along that edge.
- Take a third triangle, and pin one edge, right-side together, to the free edge of triangle #1.
- Pin one of the antennae 2" from the top, so that the majority of the antenna is on the inside with the right sides of the fabric (see right).
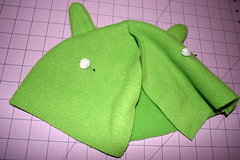 Stitch the edge of triangles #1 and #3 together, attaching the antenna between the two.
- Repeat, stitching triangles #2 and #4 together, attaching the second antenna between.
- Pin and sew the eye-circles to the right sides of triangles #3 and #4, about 2" below the antennae.
- Pin triangles #3 and #4, right-side together, and stitch them.
- Fold the hat band in half lengthwise, wrong-side together, so the band is 3" wide.
- Fold the hat band in half width-wise, right-side together, and stitch the ends together to form a circle.
- Pin the right side of the hat band to the right side of the hat body, so the seam in the hat band aligns with the seam in the back of the hat body, and stitch all the way around to attach them.
Ear flaps
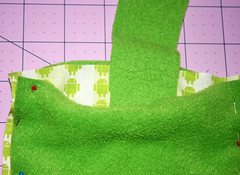
- If you want to add ear flaps, pin two of the fleece ear flap pieces, and one chin strap together (see right), and stitch around the U, leaving the top open.
- If you want to have a contrasting fabric for the outside of the ear flaps (I used some scraps of Android fabric from another project), put the contrasting fabric between the two pieces of fleece, and stitch.
- Turn the stitched ear flaps inside-out. If you're using a contrasting fabric, it should be facing out.
- Stitch the top of the ear flaps to the inner seam connecting the hat band and the body of the hat, positioned to line up with the ears. (On my hat, the ear flaps start 3" on either side of the back seam.)
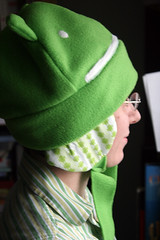
Success!
The Google Android Robot has been shared by Google using the Creative Commons 3.0 Attribution License, and this tutorial is shared under a Creative Commons Attribution-Share Alike License. Feel free to repost or modify it (as long as you credit me) or sell the resulting hats if you'd like.